|
(This section will be rechecked for accuracy but can give you a good guideline. Best to dry fit all pieces before cutting
doors, windows and wallpaper.)
This is for an optional 2nd floor. If you have an accurate steel ruler with measurements to 64ths it will make your job
much easier. These measurements are guidelines and you may want to design your own floor plan. There is no right or wrong.
My card stock was 3/64th inch thick so all of the size measurements relate to that thickness. If your card is different,
you will have to work to the base measurements and adjust your measurements accordingly. Sorry they come out to such strange
fractions.
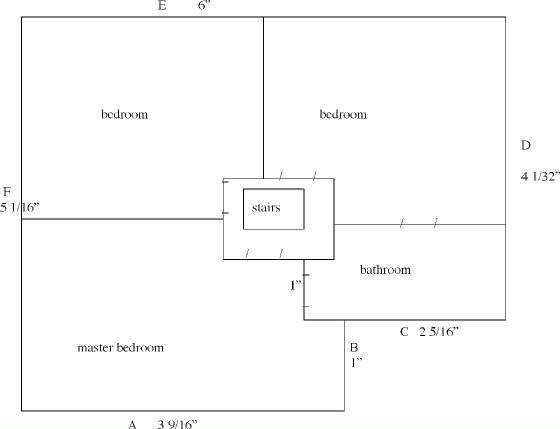
Cut your base piece 6 inches; x 5 1/16 inches;. Looking at the drawing, cut a small rectangle in one corner that measures
1 ; x 2 5/16. Then cut the opening for the staircase in the center with measurements as specified. Be very careful with
how you orient this piece. The measurements are looking down from the top side of the card.
|
| Floorplan measurements |
a) 3 1/8
b) 2 3/16
c) 2 1/8
d) 2 5/16
Measure from edge to inner square. Add the parts to be sure they add up to the full sides.
The outside walls are labeled A - F and are cut as follows. All pieces are the same height - 2 1/2 inches
A - 3 9/16 (windows 7/8 wide x 1 1/4 high - evenly spaced.
B - 1 inch
C - 2 5/16 (extends beyond B to form alcove) (windows 5/8 wide x 3/4 high)
D - 4 1/32 inches (One window for bedroom 7/8 x 1 1/4 but I may change it)
E - 5 15/16 inches (4 windows across 7/8 x 1 1/4 with slightly wider center space.)
F - 5 1/16
It will be easier to paper your walls before gluing the sides together. Leave a small overhang to fold in the corners
if you wish. Plan your inside layout before you cut the windows, or use my measurements.
I am providing a layout for the upstairs rooms - landing hallway, 3 bedrooms and 1 bathroom. You can plan your room layout
as you wish.
Cut pieces as follow:
1) 3 7/8
2 & 4) 1 1/32
3) 1 3/4
5) 2 1/32
6)1 21/32
7) 2 1/8
Use my layout or create your own. Temporarily tape the pieces in place and plan doorways and wallpaper. I made my doors
1/2 wide x 1 1/2 high. Cut the doors out before you do your final gluing. I used the cut out piece for the door and dark
manila folder stock for the frames. I used scrapbooking papers for the walls and doors. Or you might print out a pattern
on your color printer.
When you wallpaper the inside, leave a small overhang at the corners to give you a nice corner joint (as was done on the
first floor). When all pieces work well together, glue the pieces with the overlap folded so it can help to support the walls.
(See photo) You don't need to attach the inner walls to the outside if you don't wish to. That way you can change the configuration
if you wish. In the master bedroom next to the bathroom door I extended the outer wall slightly into the room to create an
alcove. You may make the wall flush if you prefer.
I used a thin flocked paper for the carpet and printed a tile floor for the bathroom. For a nice shiny white finish I
used cut photo paper.
Next lesson will cover the roofs (2 choices) and outside finishes.
|